

News
05
Nov
Tool Cabinet Organization: A Four-Step Method That Survives a Busy Week
Most tool cabinets are not badly made. They are badly assigned. A drawer full of sockets in four drive sizes and no dividers is not storage — it is a pile with a lid, and the technician spends ninety seconds a day finding things in it that should take three.
Tool cabinet organization is a method, not a shopping list. It has four steps: sort by frequency, give every tool a fixed position, layer by weight, and label the drawer, not the tool. Done properly, it takes one afternoon and pays back every shift after that.
Why Cabinets Fail as Storage
Three failure modes account for almost every disorganised cabinet.
1. Tools are filed by category instead of by use. All sockets in one drawer sounds logical until you need a 10 mm deep socket while holding a wrench in the other hand — and it is in the third row of a drawer arranged by drive size. The right grouping is by job, not by family: the tools that get used together live together.
2. No fixed position means no feedback. If a tool's home is "somewhere in that drawer", the drawer can be half empty and nobody notices. A fixed position — a cut-out, a marked outline, a divider slot — makes a missing tool visible at a glance. This is the entire logic of shadowing, and it works because it converts "is the tool there?" from a search into a glance.
3. Weight is distributed by convenience instead of by physics. Heavy items in the top drawer raise the centre of gravity, strain the runners, and make the cabinet a tipping risk with the drawer open. A loaded top drawer on a rolling cabinet is also a movement hazard: the cabinet becomes unstable the moment it rolls over a joint.
Step 1: Sort by Frequency, Not by Category
Empty the cabinet onto a bench and make three piles. This takes about twenty minutes and is the step people skip.
Pile A — used most shifts. The 10 to 20 tools that come out every working day: ratchet, common sockets, screwdrivers, pliers, a hammer, the measuring tool.
Pile B — used weekly or monthly. Torque wrench, pullers, specialty sockets, diagnostic adapters, the second set of spanners.
Pile C — used rarely but must be on hand. Extraction kits, seal drivers, rarely used adapters, calibration certificates, spare parts.
Pile D — not tools. Old receipts, three broken screwdrivers, a rusted file, parts that belong to a job finished in March. This pile is often a third of the drawer volume.
Pile D goes out. Then map the piles to the cabinet by access cost, which is a function of height:
The rule behind the table: the most-used tools go at chest and waist height, the heaviest tools go low. Those two rules conflict for a heavy, frequently used item — a large wrench set, for example — and the resolution is to put it in the middle, at hip height, where the lift is short and the reach is comfortable. Never in the top drawer.
Step 2: Give Every Tool a Fixed Position
This is the step that turns a tidy cabinet into a system. Three techniques, in ascending order of effort.
Dividers and slot racks. Cheapest and fastest. Socket rails, wrench racks, and screwdriver dividers cost little and eliminate the "everything slides forward when the drawer opens" problem. If the cabinet's drawers came with removable foam or rubber liners, the liner is already the base you need — cut slots rather than adding a second layer.
Shadowing with foam. A two-layer foam insert: a base layer and a top layer with cut-outs in the shape of each tool. When a tool is out, a bright-coloured void shows exactly what is missing. This is the standard in aviation and motorsport, and it is what makes a shared cabinet auditable — you can see a missing tool without opening every drawer.
Magnetic and peg systems. Good for frequently moved items and for the inside of a cabinet door, which is otherwise dead space. Less good for precision tools, which should not sit against a magnet. If the shop has more small hand tools than drawer space, a hanging tool cabinet gives the same shadowing logic on a wall, which is often the better home for the tools that are used hourly.
Practical note on the liner material the cabinet ships with: foam is the right base for shadowing, rubber is a non-slip mat. If shadowing is the plan, confirm the liner type before ordering, because cutting a rubber mat into shapes produces a mess while cutting closed-cell foam produces a clean outline.
Step 3: Layer by Weight
Load distribution is where an organised cabinet becomes a safe one. Four rules:
Heaviest at the bottom. Pullers, slide hammers, large wrench sets, dense specialty tools. This lowers the centre of gravity and shortens the lift.
Never load the top drawer heavily on a rolling cabinet. A 1,010 mm cabinet loaded at the top is unstable when it moves, and the top drawer's runners take the worst of it.
Keep the drawers that open over a walkway light. A cabinet parked in an aisle with a heavy drawer open is a hazard to anyone passing.
Respect the drawer rating. This model publishes no per-drawer or total load rating, so the rating has to come from the supplier — ask for it, then load to about 80 percent of it and no more. Loading "until it feels heavy" is how drawer runners fail.
Weight also determines how the cabinet behaves when it rolls. A cabinet loaded with heavy tools low rolls predictably; one loaded top-heavy rocks on its casters and puts a shock load into the front casters every time it crosses a joint.
Step 4: Label the Drawer, Not the Tool
Labels belong on the drawer front, where the person looks before opening. Three rules:
Label by function, not by contents. "Sockets 1/4 & 3/8" beats "sockets", and both beat a list of every size.
Use a consistent scheme across cabinets. If two technicians share a shop, the same drawer location should hold the same category. This makes the shop legible and makes a borrowed cabinet usable.
Put the torque and calibration items where the labels can carry a date. Torque wrenches need calibration intervals; a label with the last calibration date on the drawer beats a certificate in a folder nobody opens.
For a shared cabinet, add a closing checklist on the inside of the top drawer: the five tools that must be present at end of shift. It takes ten seconds and catches the missing-tool problem before it becomes a lost-tool problem. Laminate it. A paper list on the inside of a drawer is gone within a month, and with it the habit.
The Rolling Cabinet Adds One Rule
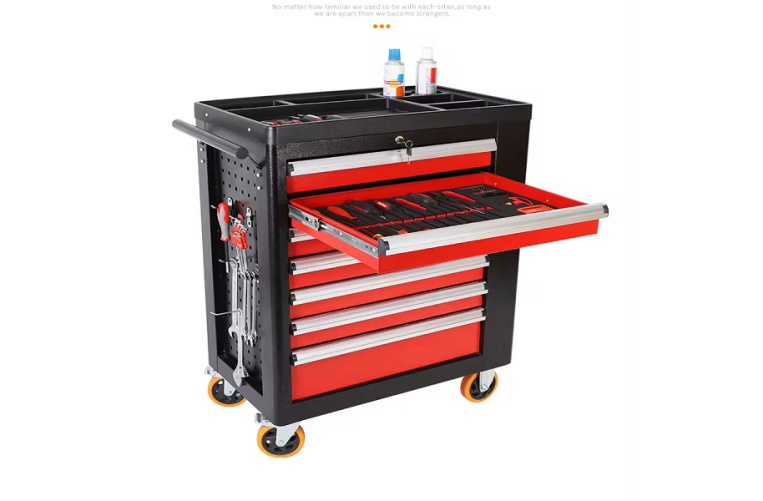
A mobile cabinet — one on casters, like a 7-drawer rolling unit — introduces a constraint a fixed cabinet does not have: everything must survive transport.
That means:
Drawers must lock before the cabinet moves. A central key lock makes this one action; separate drawer locks make it seven opportunities to forget. If the cabinet does not have central locking, the organization plan must include "lock all drawers" as an explicit step before rolling.
Nothing stands loose on the top plate in transit. Trays and parts go inside a closed drawer, not on the work surface.
Tall items lie down. A screwdriver standing in a holder will fall over on the first doorway; store tall tools horizontally or in a closed drawer.
The top drawer is the first thing to settle. Vibration compacts loose items downward. Pack the top drawer with dividers so items cannot migrate.\n\nOne more, specific to a 7-drawer cabinet with mixed drawer depths: put the shallow drawers above the deep ones. Deep drawers at the top are where loose items end up buried, and the weight distribution works better with the densest drawers low regardless of the layout the cabinet shipped with.
5S and Shadow Boards: Where They Fit
If the shop runs 5S, the cabinet is a natural home for the first three S's, and the fourth is where most implementations stall.
Sort (seiri): the Pile D purge above.
Set in order (seiton): the frequency mapping and fixed positions.
Shine (seiso): a wipe-down routine, and a rule that fluids never go in a tool drawer — brake fluid and coolant leak, and a leak inside a drawer destroys liners and corrodes tools.
Standardise (seiketsu): the labelling scheme, applied identically across cabinets.
Sustain (shitsuke): an audit. Without one, a shadowed drawer drifts back to a pile in about three months.
The audit that actually works is short: once a week, open every drawer and photograph it. Photos take two minutes, and comparing this week's photo to last week's shows drift before it becomes the norm. It is more effective than a checklist, because it requires no judgement while filling it in.
A One-Afternoon Plan
Empty one drawer at a time onto a bench, not the whole cabinet — the cabinet must stay usable during the process or the shop stops working.
Make the four piles for that drawer's contents, and dispose of Pile D immediately. Do not create a "maybe" pile; it becomes the next drawer's problem.
Assign by frequency using the zone table, and accept that some tools will move twice before they settle.
Install dividers or cut shadow foam for that drawer only. Finishing one drawer properly beats half-finishing seven.
Label the drawer front and photograph the open drawer.
Repeat for the next drawer on the following shift. A cabinet reorganised over a week in fifteen-minute blocks gets finished; one that requires a full day gets abandoned after two drawers.
Set the weekly photo audit and put it on whoever opens the shop on Monday. Name the person in the plan, not the role — a shared responsibility is not a responsibility.
Frequently Asked Questions
Should heavy tools go in the bottom drawer?
Yes, on any cabinet — and especially on a rolling one. Heavy items low keep the centre of gravity down, shorten the lift, and stop the cabinet rocking on its casters when it moves. The exception is a heavy tool used every shift: put that at hip height, where the reach is short and the lift is small.
What is the best way to organize sockets and wrenches?
Socket rails and wrench racks with marked sizes, sized to the drawer. Organising by drive size and then by size within the drive is the standard, and it only works if the rail is fixed to the drawer so the tools cannot slide. Loose sockets in a drawer waste more time than almost any other tool category.
Is foam shadowing worth the effort?
For a shared cabinet, a shop that audits tool inventory, or any environment where a missing tool is a safety issue, yes — the void makes a missing tool visible without opening the cabinet. For a single technician's personal cabinet, dividers and racks deliver most of the benefit for a fraction of the work.
How do I stop tools sliding when the cabinet moves?
Three things: a non-slip liner in the drawer, dividers or shadow foam sized to the drawer interior, and locking all drawers before rolling. A central key lock makes the last one a single action rather than seven.
Can I store fluids and chemicals in a tool drawer?
No. Brake fluid, coolant, and solvents leak, and a leak inside a drawer destroys the liner, corrodes tools, and creates a fire and fume hazard in an enclosed steel box. Keep fluids on a separate shelf with a spill tray, and never in the same compartment as tools.
How often should the cabinet be reorganized?
A full reorganisation is a once-a-year job if the labelling and the weekly photo audit are maintained. Without the audit, expect drift within about three months — the audit is what makes the system self-correcting.
Does this method work for a mobile cabinet that moves between bays?
Yes, with one addition: everything must survive transport. Drawers locked before rolling, nothing loose on the top plate, tall tools stored horizontally, and the top drawer packed with dividers so vibration cannot compact the contents into a pile.
How do I keep a shared cabinet organized?
Same drawer location for the same category across all cabinets, labels by function rather than contents, a five-item closing checklist inside the top drawer, and a named person who owns the weekly photo audit. Shared cabinets fail on ownership, not on layout.
A cabinet is only as good as its assignment. The MINNO Mechanic Professional Cabinet (MN-T087) gives seven drawers in a 1,010 × 765 × 460 mm steel body with removable liners for shadowing, a central key lock so drawers stay shut in transit, and custom drawer configurations if your tool set needs a different split. Tell us your longest tool and your heaviest drawer load and we will confirm the drawer layout. For shops that need fixed or wall-mounted storage instead, the tool cabinet range covers those formats too.

Our Contact
Minno Furtniture
Customize smart storage lockers,parcel delivery lockers, key management cabinet,Vending machines,Office/School and home furniture.
-
Call For Inquiry
-
Send Us Email
sales@buysmartlocker.com
Need Help For Project!
We are ready to help your next projects, let’s work together
 WhatsApp
 sales@buysmartlocker.com
 +8613213557186